The system doesn't use any third party services or APIs. It is purely built upon native JavaScript APIs and pure PHP.
Quick Start
Introduction
Hey there! Thank you for your interest in Digital Signer!
Digital Signer is a PHP system that allows users to create digital signatures, add text, shapes, symbols inputs, sign PDF documents online and many more features. Digital Signer allows users to manage files through a database file system and folders. Requesting signatures couldn’t be more easier since it’s just a matter of sending an email request via Request sign feature. We have a lot more features in signer. Check out some of them on the Features.
What framework is used?
- Digital Signer software is built on raw PHP and no framework used.
- Digital Signer is faster than ever with clean code written on PHP with MVC model and JavaScript.
License
This software is sold exclusively through Codester, where the Codester Standard Licenses apply.
Use only if you purchased a valid license on Codester and buy more licenses if you need to use it on other servers.
Features
Create Electronic signatures: Digital Signer allows users to create digital signatures they can use to sign documents online. Digital Signer supports three ways to create a digital signature.
Digital and electronic signature: Use a digital certificate to sign documents with a digital signature. The document can be signed electronically and digitally.
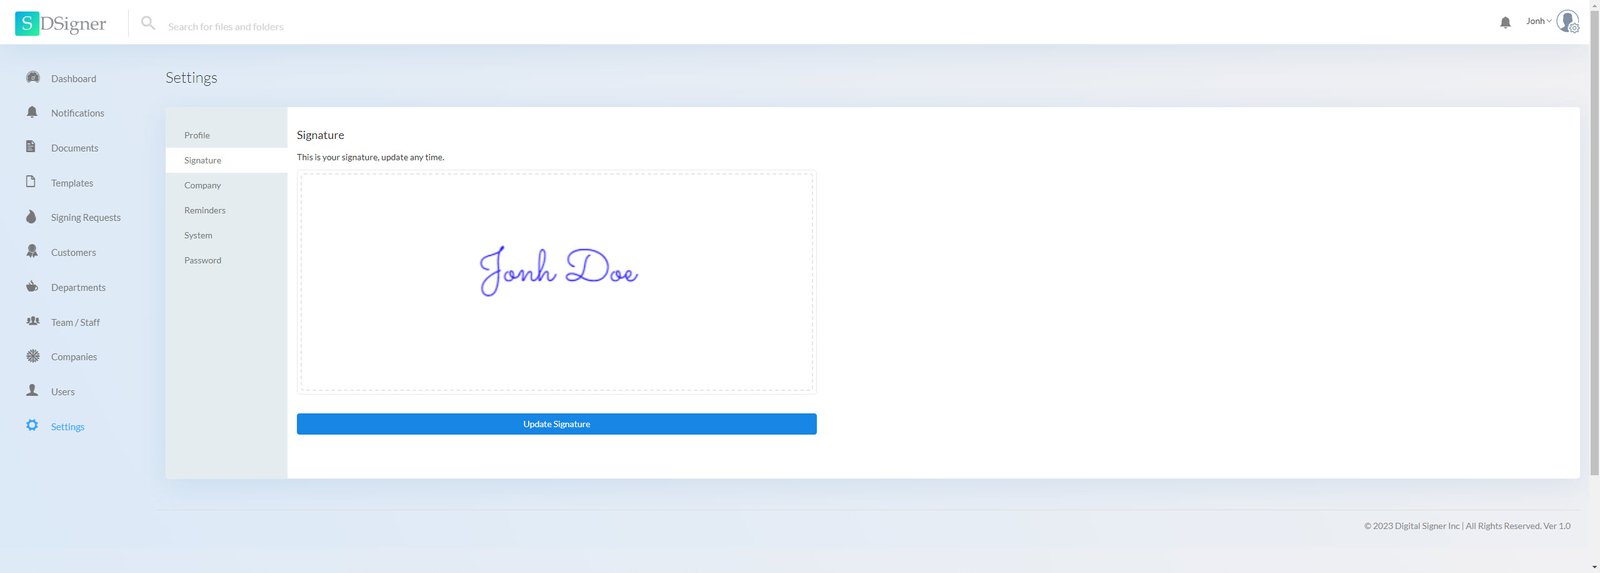
Drawing: We have created a drawing pad where you can draw your own signature on a phone, tablet or computer to match your signature. Once you have drawn your signature it will be saved and no need to re draw again unless you want to update it.
Text Signature: Digital Signer gives you suggestion if text signature where you type your signature and you choose from a list of handwritten fonts that will create a signature from your name. You can update the styling options like color, weight etc
Upload: if you already had a digital signature on your phone or computer you can simply upload it and use it on signer.
Sign PDF files: Once you have created your signature you can sign any document, anytime, anywhere using Digital Signer. Digital Signer is mobile friendly, that means you can use any device. Sign on the go.
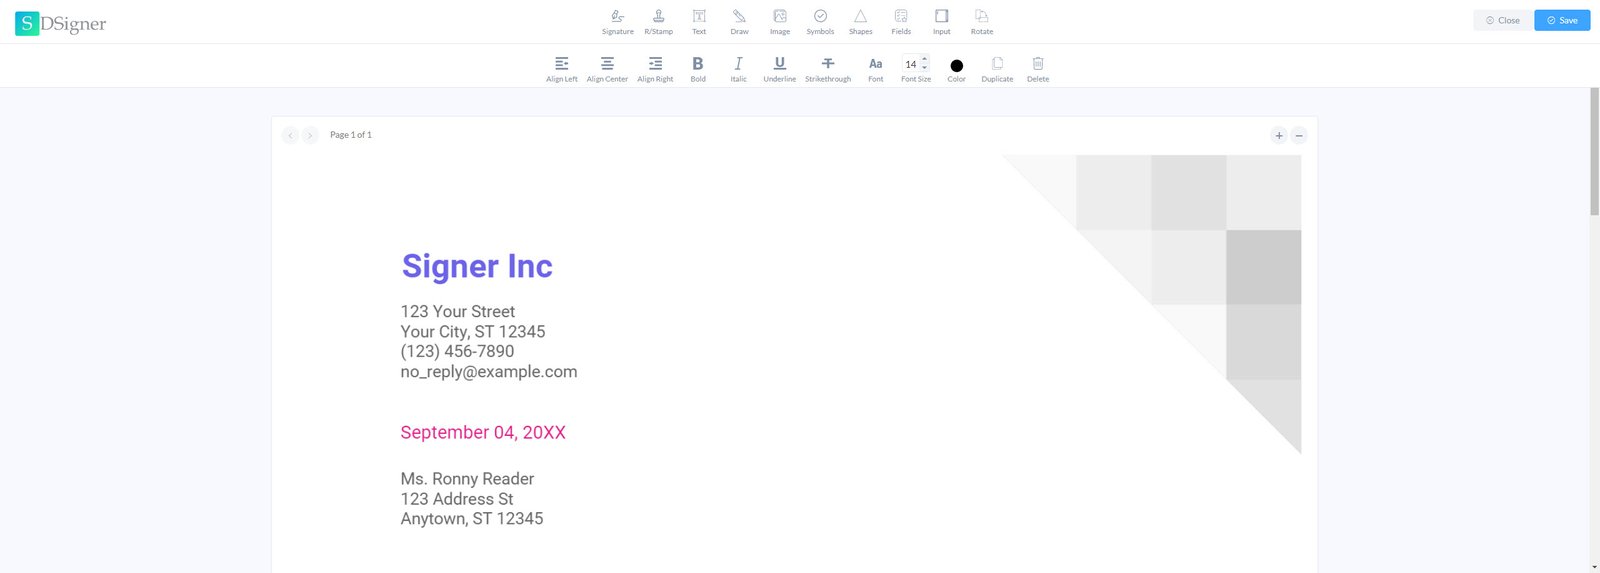
Add text to PDF files: If you text content to add to your PDF document. You can simply add them using out PDF editor that allows you to add text and style them. We support wide text styling: bold, italic, color, font size, font type, underline, strike through etc.
Add symbols, images & shapes to PDFs: With the new Digital Signer editor you can add symbols, shapes and images to you pdf. You can resize, color and duplicate these elements.
Templates: If you template contracts, agreements etc. Pretty much any template you use on your business. You can upload them on Digital Signer, add fields and share with your team, clients or freelancers to sign or edit.
Add custom fields and inputs: You will always have fields that are needed regularly when dealing with documents. Fields like Full name, email, address etc. You can create and save a list of your custom fields on Digital Digital Signer and use them whenever you need. This saves you a lot of time and hustle of typing them over and over again. With Inputs, You can add inputs to your PDF document and when you send a request. The recipient will receive the document and asked to fill the inputs you created.
Multiple file formats: Digital Signer now support four file formats: PDF, Excel, Word & Powerpoint. So you don’t have to worry about any limitations. Digital Signer has Cloud Convert that will allow you to convert this files to PDF before you edit them or send requests.
Departments: This feature comes in handy when you are working in a company with departments. You can create departments and add team to each department. After that files can be shared to select departments and will only be visible to members of that department only.
Password Protected folders & files: Another security feature that comes with signer is password protection. You can protect your files or folders with a password and no one can access them without the password.
Bulk delete files and folders: Initially files where deleted one by one which was hectic but now you can select multiple files and delete them.
Drag and drop files to folders: You can move files and folders by simply dragging them and dropping them on the folder you want to move to.
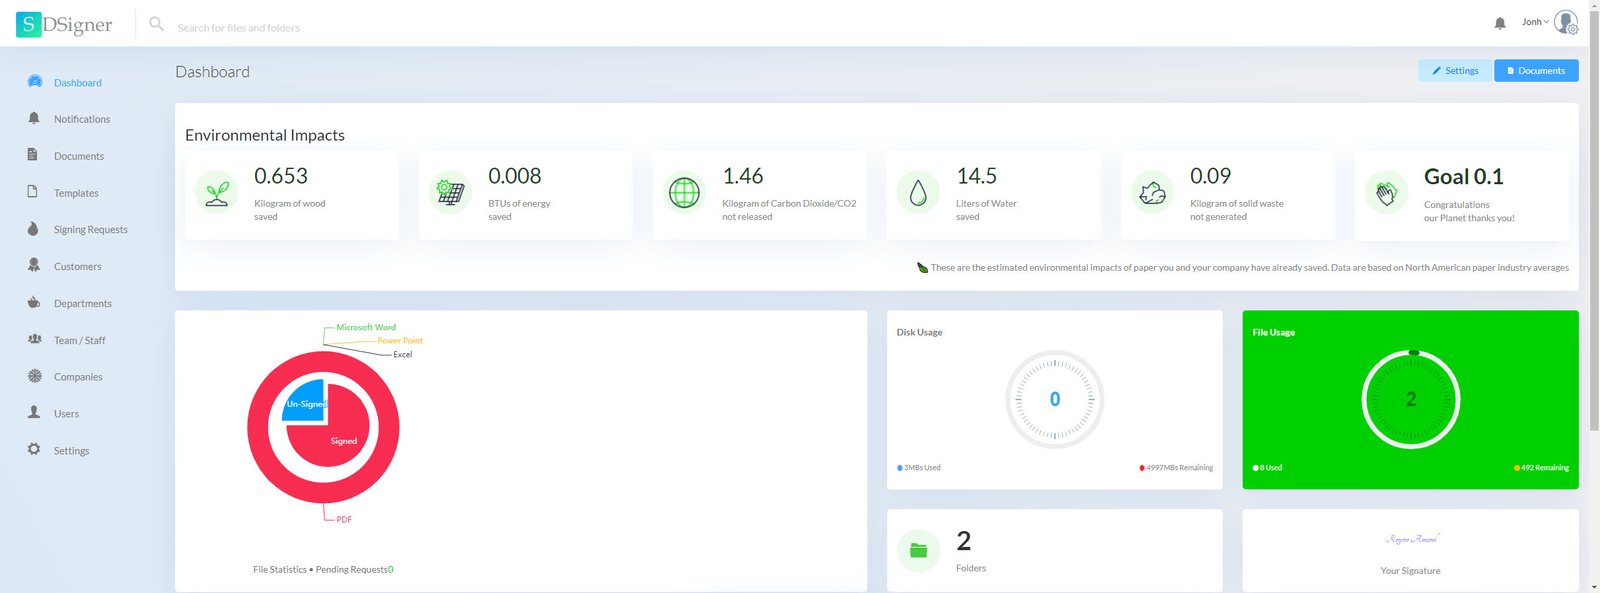
Disk usage and file usage limits: Monitor you files and disk usage from your dashboard. For those buyers who use signer for commercial purpose this feature comes in handy when billing your clients.
Rotate files: Rotate PDF Pages online
Signature Request: Digital Signer allows user to request other parties to sign a document via email. You can send a request to users who don’t have Digital Signer accounts and they can sign as guests with no account. Also you can select specific points on your document you want the other party to sign.
Import files: Digital Signer supports importing files from dropbox and google docs. So you don’t need to worry about downloading them the re uploading them.
Signed digital signature: Signature signed on documents by Digital Signer are Valid self signed signature and are recognized by other softwares like Adobe.
Fast processing speed: We have improved our structure and code. Digital Signer is faster than ever with clean code written on PHP with MVC model.
Reminders: If a request is not signed on time Digital Signer will send automated reminder to your recipients and let work on other important stuff.
Notifications: Real time signing request notifications will pop up when you receive one and also send you an email when you there is a new notification.
File system: We have a simple and beautiful file system that allows you to manage your files and folders.
Teams & customers: Manage your teams and customers from a simple dashboard and send them requests when needed.
Multi user: You can build a saas software with Digital Signer since it supports multiple user accounts. There can be business and personal accounts. Business accounts has got a little bit more features than personal accounts.
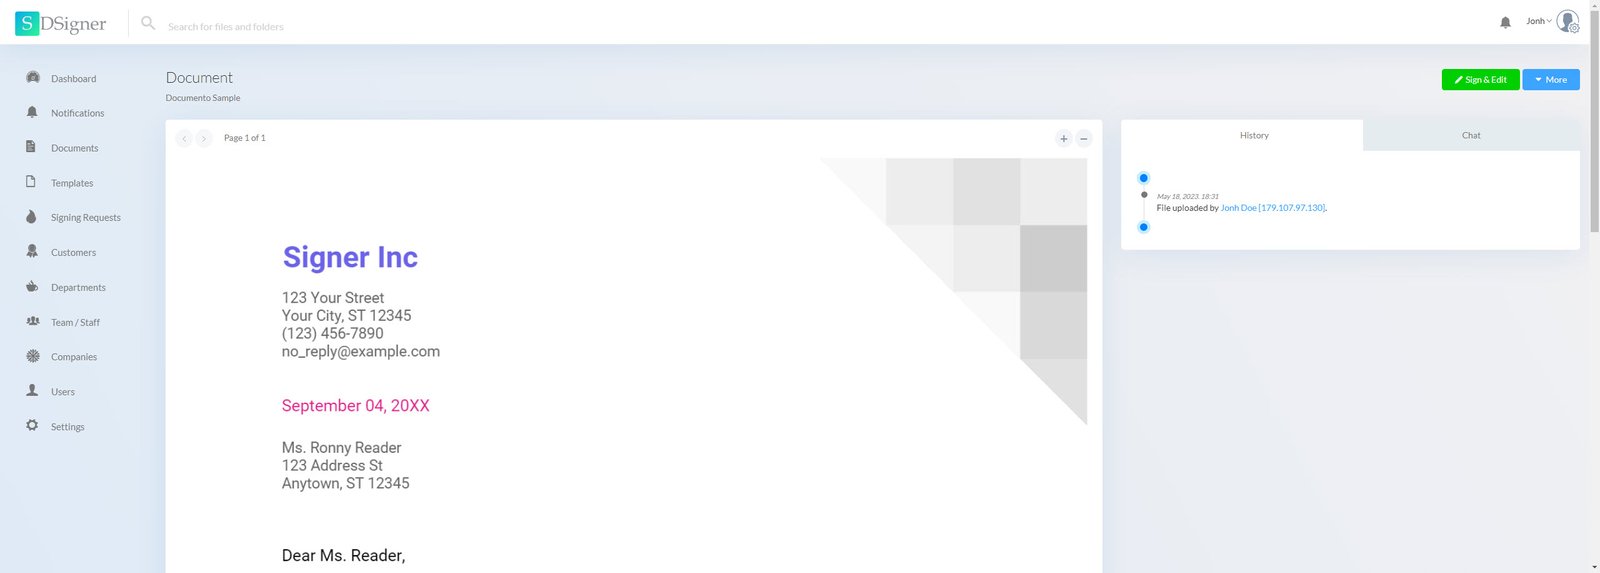
Document Chat: Document is an amazing feature that allows easy collaborations. Users can chat on doc and also save notes on the same chat. Chat history is recorded for each document. So documents have unique chat history.
Document history: This feature allows you to keep track of what has been going on with the document since the time it as uploaded.
Duplicate files: Instead of uploading a similar document, you can simply duplicate them via Digital Signer.
Accessibility: You can adjust document accessibility to decide who sees a document. You can see it to be visible to everyone, departments or only you.
Responsive: Digital Signer is fully responsive and can be accessed from any device.
Beautiful and responsive UI: Digital Signer was made with love and passion that’s why it looks stunning.
Requirements
The system works in any server that has PHP installed
- Shared hosting, VPS or dedicated server
- Web server
- PHP >= 7.4
- MySQL
Notes:
- The installation manual will help you install all the dependencies
- HTTPS is optional but recommended
Installation
Additionally, we can perform the installation on your server. Pay a fee of U$99.00 (Via Stripe). Get in touch to get started.
1) Copy Files
Unzip the file you downloaded from Codester, copy the contents in the folder called dsigner and paste them in your desired directory where you want to install the system.
Give read and write permission on /uploads folder and sub folders
If you are installing Digital Signer inside a folder, for example, https://example.com/signer or localhost/signer, after uploading the files to the server, follow the steps in this item.
We have built our latest applications on a simple PHP framework we created that makes it easy to deploy our applications.
By default the scripts assume you are installing in a new domain or a sub-domain. If you intend installing the script within a sub-folder you will need to make a simple tweak to the script.
We do NOT recommend installing in a sub-folder. We recommend always using a sub-domain (or a domain) for the application. This ensures that there are no configuration inheritance issues from other scripts in other folders.
By a sub-folder, we mean within the URL, not within the file system of your hosting account.
An example of a sub-folder is:
https://mydomain.com/myscript
An example of a sub-domain is:
https://myscript.mydomain.com
If you are unable to use a domain or sub-domain, follow the steps in this item after uploading and unzipping the files.
2) Import Database
Create your database with CHARSET=utf8mb4 and COLLATE=utf8mb4_general_ci
When you unzip the file in step 1, you will find a folder called database. There you will find a SQL file, which is the system database. Create your database with CHARSET=utf8mb4 and COLLATE=utf8mb4_general_ci and then Import it into your PhPMyAdmin or whatever system you use.
3) .htaccess file
This is a very important file that you will find in the signer main folder, this file creates the SEO friendly URLs. if you can see it, change your directory setting to show (. files) and if you still can see it you can copy again from your unzipped downloads folder.
4) Edit .env file
On the folder you pasted on your installation folder, you will find a file called .env . This is a very important file that stores system variables. Open the file in a text editor and edit the following lines. The other lines can be edited via the system settings page so don’t worry about them.
APP_URL=https://example.com
DB_HOST=localhost
DB_USERNAME=username
DB_PASSWORD=password
DB_DATABASE=database_name
5) Email SMTP settings
SMTP settings on the settings page are your email settings, this system depends on them to send important system emails, without them your emails wont work. So please don’t forget to update them.
Now you are all set!.
6) Cloud Convert API key (optional)
Cloud convert key is required if you intend to upload word (.docx) files, this API will be used in converting .docx files to pdf. To get the API key, Create An Account here, the click this link https://cloudconvert.com/dashboard/api to get your API key
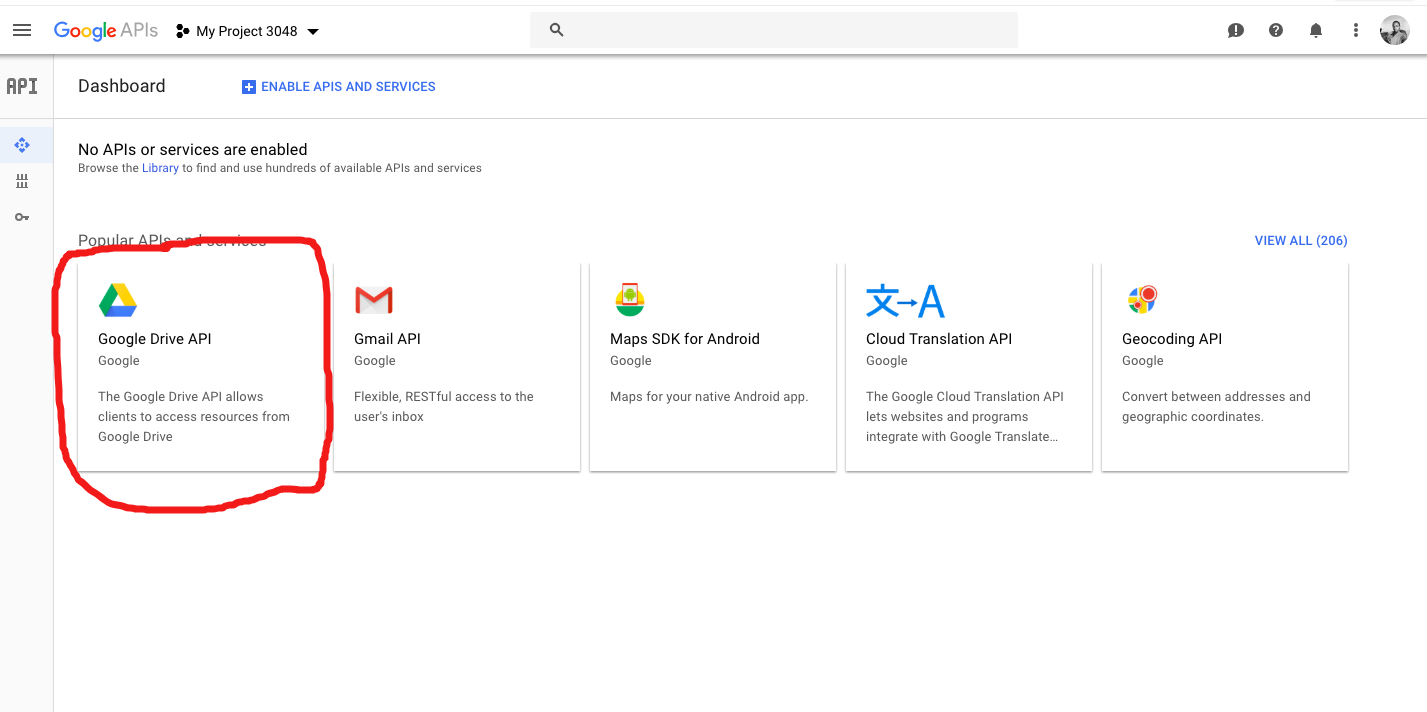
7) Google API key (optional)
This is required for importing files from users google drive accounts, follow this instruction on how to create a Google Oauth Client Id and follow this instructionsto create and API key. Once you have created a project, api key and client id, you now need to activate Google drive API, follow this instruction and enable Google drive API as shown on the image below.
8) Dropbox API key (optional)
Digital Signer provides the ability to import documents from a Dropbox account. This functionality is optional and can be disabled by having an empty Dropbox App key on the System Settings screen.
If you do wish to use this functionality, a Dropbox App Key for your Dropbox account is required.
Please refer to the instructions on how to Create a Dropbox App and set the options as shown below.
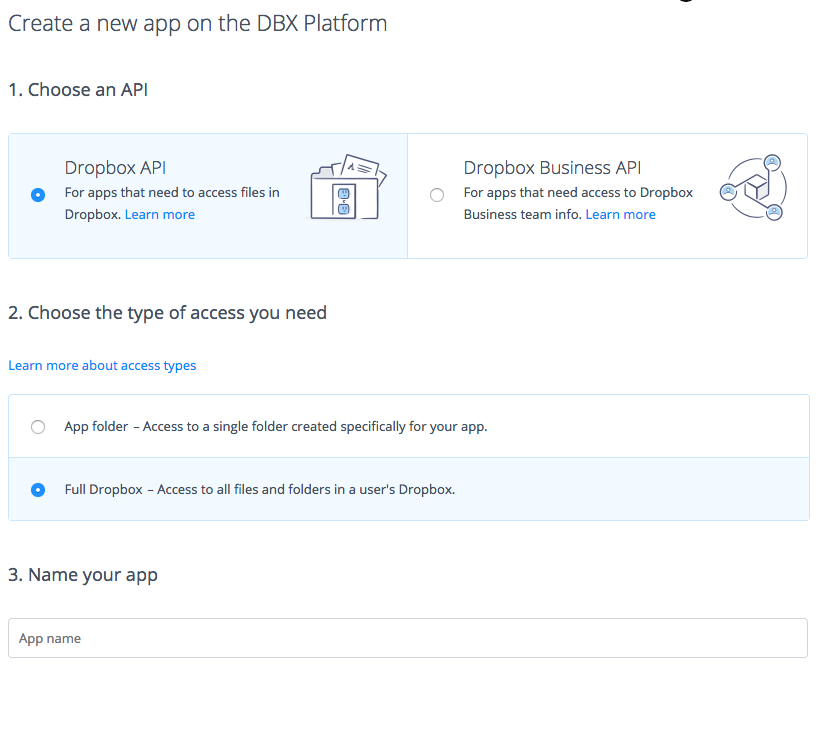
On the next screen under Chooser/Saver domains, enter your domain name and under Redirect URIs enter https://yourdomain.com/dropbox/web-file-browser.php/dropbox-auth-finish
9) Use Digital Certificate (optional)
You can use any Digital Certificate (p12 format) to transparently digitally sign your documents
You can purchase a Digital Certificate with legal validity from a third-party Certificate Authority (CA), look for a CA in your country or search GlobalSign, IdenTrust, DigiCert or Entrust
If your Digital Certificate is in .p12 format, upload the Digital Certificate .p12 to the uploads\credentials folder
If your Digital Certificate is in .pfx format, you must generate the certificate in .crt format with the command below in your terminal
openssl pkcs12 -in certificate.pfx -out certificate.crt -passout pass:YourPassword -nodesUpload the Digital Certificate .crt format to the uploads\credentials folder
Logged in as admin, access the Settings > System menu and enable the Activate PKI digital signature option.
Open your .env file and find the CERTIFICATE_NAME and CERTIFICATE_PASSWORD item and enter the digital certificate file name and password
CERTIFICATE_NAME=namecertificate.p12
CERTIFICATE_PASSWORD=PasswordCertificate
10) Create your Digital Certificate (optional)
If you don't have a Digital Certificate, you can create your own Digital Certificate, may not be legally binding in your country, check your local laws. Use the codes below to create the .crt file and the .p12 file from your terminal.
1. Create the crt file
openssl req -x509 -nodes -days 36500 -newkey rsa:1024 -keyout certificate.crt -out certificate.crt2. Create the p12 file from crt file
openssl pkcs12 -export -in certificate.crt -out certificate.p12Obtain a digital certificate and create a digital signature from Windows
Go to this link and follow the steps > https://support.microsoft.com/en-us/office/obtain-a-digital-certificate-and-create-a-digital-signature-e3d9d813-3305-4164-a820-2e063d86e512
Upload the Digital Certificate .p12 format to the uploads\credentials folder
Logged in as admin, access the Settings > System menu and enable the Activate PKI digital signature option.
Open your .env file and find the CERTIFICATE_NAME and CERTIFICATE_PASSWORD item and enter the digital certificate file name and password
CERTIFICATE_NAME=namecertificate.p12
CERTIFICATE_PASSWORD=PasswordCertificate
You also need to ensure the option to “Allow users to download p12 certificate” is enabled on the Settings > System page
11) Cron job settings
You need to set a cron job that will be running daily to check for late signing requests. This is necessary is you have turned reminders ON. Below is a sample cron job code.
0 0 * * * /usr/local/bin/php -q /home/YOURUSERNAME/public_html/cron.php;Here is a great YouTube Video to help you with cron jobs if you are new.
Installation inside a folder
Follow these steps only if you are installing Digital Signer inside a folder, for example https://example.com/signer or localhost/signer
Step 1:
Open routes.php files located inside the src folder and you will see a commented out line of code that looks like the one below
// Router::group(['prefix' => '/foldername'], function() {and the line below at the end of the file
// });Step 2:
Uncomment the two lines above by removing the two forward slash before them. //
Step 3:
Rename the foldername to the name of your folder for example myapp, and you will have something like.
Router::group(['prefix' => '/myapp'], function() {
 ...
 });
That’s all!
Login
Go to the URL of the script you installed
https://mydomain.com/myscript
or
https://myscript.mydomain.com
Default access credentials:
E-Mail: admin@mail.com
Password: password
Customization
We accept Digital Signer customization requests, we make specific and personalized changes on demand, with each request we carry out a development analysis and determine the number of hours to develop. We send a request proposal. The value of the development hour is U$25 (pay via Stripe)
E-Mail support@raptecnology.com with a valid Codester Username and Purchase Code for verification and details of your customization request.
Below are important PHP, JS, CSS and PHP files for easy customization.
1) CSS files
Digital Signer uses one main CSS file located in the assets folder. You can edit this file to add your custom styling.
// file path
assets > css > style.css
2) JS files
Digital Signer user three main JS files, the first one is app.js; this file contains system wide js functions for manipulating the DOM. The second one is signer.js; This file has functions that only work on the signing page and performs signing & editing functions only. The third one is files.js; this one is used pages that has a file manager; that is dashboard, documents page and templates page.
We use a js framework called simcify (simcify.js) which has reusable functions like form submission, validations and other DOM interactions.
// Edit this to add global scripts that work
 on all pages
assets > js > app.js


                                        // Edit this to add scripts that work
 on the signing page
assets > js > signer.js


                                        // Edit this to add scripts that work
 on the file manager page
assets > js > files.js
3) PHP files
Digital Signer uses PHP exclusively for server side coding, all view files are under views folder and included files such as sidebar, header, footer & email templates files are under views/includes folder and TCPDF library, controllers and function files are in the src folder.
Digital Signer uses two major PHP libraries
TCPDF – for saving and manipulating pdf documents.
PHPMAILER – for sending emails.
PHP SIMPLE ROUTER – for routing.
Check composer.json for all PHP libraries used.
Support
Before requesting free support, please
- Make sure it's a valid issue (BUG) and not a customization request
- Make sure you have tried the troubleshooting steps from installation guide
free Support can be used
- If you are facing issues installing the system
- If you have faced a technical issue or bug
- If you don't understand the system and it's flow
free Support can not be used for
- Customization services
- Integration with other softwares
- If the system files are modified or edited
Please email your queries at support@raptecnology.com with a valid Codester Username and Purchase Code for verification.
Thank you for your interest and purchase of the Digital Signer source code 😀